Panning in Lumix
S5II Smooth Pan Preset – Step-by-Step
1. Switch to Video Mode
- Turn the mode dial to the film strip icon (Video Mode) so all settings apply to video.
2. Set Frame Rate & Shutter
- Menu → Video → Rec Format / Rec Quality
- Choose 24p or 25p for cinematic look (or 30p if you want smoother motion for TV/web).
- Menu → Video → SS/Gain Operation → Shutter Angle
- Set 180° (so shutter = 1/50 at 25p or 1/48 at 24p).
This gives natural motion blur and reduces jerkiness.
- Set 180° (so shutter = 1/50 at 25p or 1/48 at 24p).
3. Adjust Stabilisation
- Menu → Video → Image Stabilizer → E-Stabilization (Video) → OFF
- Menu → Video → Image Stabilizer → Operation Mode → Panning (Mode 2)
- Menu → Video → Boost I.S. (Video) → OFF
(This stops the stabiliser from fighting your horizontal movement.)
4. Exposure & ISO
- ISO: Auto ISO ON
- Menu → ISO Sensitivity Settings → Min. Shtr Speed → Not relevant for video (video shutter is locked by shutter angle).
- Aperture: Pick for desired depth of field.
5. Picture Profile (Optional)
- Menu → Photo Style → e.g., V-Log (for grading) or Natural (for straight-out-of-camera).
6. Save to C1
- Once all settings are as above, press Menu → Setup (wrench icon) → Save to Custom Mode.
- Select C1 and confirm.
- Now, anytime you want to do smooth pans, just turn the mode dial to C1.
How to Use in the Field
- Handheld: Hold steady, pan in ~7–10 seconds across the frame.
- Tripod: Keep IBIS ON if you’re handheld, OFF if you’re fully locked to tripod.
- No jerks, no “stabiliser snap” when you move.
If you want, I can also make a second preset for handheld walk-and-talk so you can instantly swap between “Smooth Pan” and “Moving Shot” with optimised IBIS/E-Stab settings. That way you have one for controlled pans, one for dynamic movement.
Got it — here’s your Lumix S5II “Handheld Walk-and-Talk” Preset to pair with the “Smooth Pan” one.
We’ll store this in C2 so you can swap instantly.
🎥 S5II Handheld Walk-and-Talk Preset – Step-by-Step
1. Switch to Video Mode
- Mode dial → Video mode (film strip icon).
2. Set Frame Rate & Shutter
- Rec Format / Rec Quality → Same as your panning preset (e.g., 24p or 25p).
- SS/Gain Operation → Shutter Angle → 180° (1/48 for 24p, 1/50 for 25p).
- Keeps motion blur natural and avoids the “GoPro crispy” look.
3. Stabilisation for Walking Shots
- Menu → Video → Image Stabilizer → E-Stabilization (Video) → ON
(Digital stabilisation smooths out the micro-bumps from footsteps.) - Menu → Video → Image Stabilizer → Operation Mode → Normal (Mode 1)
(Lets IBIS work in all directions — needed for walking.) - Menu → Video → Boost I.S. (Video) → OFF
(Boost IS is only for static shots — walking with it ON will cause warping.)
4. Exposure & ISO
- ISO: Auto ISO
- Aperture: Adjust for desired depth of field (wide open for blurred background looks great in walk-and-talks).
5. Picture Profile
- Same as your panning preset (V-Log for grading or Natural for quick delivery).
6. Save to C2
- Press Menu → Setup (wrench icon) → Save to Custom Mode.
- Select C2 and confirm.
📸 How to Use
- C1 = Smooth Pan (IBIS Panning Mode, E-Stab OFF)
- C2 = Walk-and-Talk (IBIS Normal Mode, E-Stab ON)
- Switch instantly on the mode dial without reconfiguring menus.
💡 Pro tip for walk-and-talk:
Keep elbows slightly tucked, knees bent, and take shorter steps to help the IBIS/E-Stab combo. If you want near-gimbal smoothness, use a ninja walk (heel-to-toe rolling motion).
If you want, I can also give you a matching C3 “Static Tripod Shot” preset so your stabilisation and shutter settings are optimised for completely locked-off scenes — no micro-wobbles, no unnecessary IBIS processing. That would make all three modes cover almost any shoot situation.
lright — here’s your Lumix S5II “Static Tripod Shot” Preset to complete the set.
We’ll put this in C3, so your mode dial becomes:
- C1 → Smooth Pan
- C2 → Handheld Walk-and-Talk
- C3 → Static Tripod Shot
🎥 S5II Static Tripod Shot Preset – Step-by-Step
1. Switch to Video Mode
- Mode dial → Video mode (film strip icon).
2. Set Frame Rate & Shutter
- Same frame rate as your other presets (e.g., 24p or 25p).
- Menu → SS/Gain Operation → Shutter Angle → 180° (1/48 for 24p, 1/50 for 25p).
3. Disable All Stabilisation
On a tripod, any stabiliser will cause micro-drifting or warping, especially in long lenses.
- Menu → Video → Image Stabilizer → OFF
- Menu → Video → E-Stabilization (Video) → OFF
- Menu → Video → Boost I.S. (Video) → OFF
(This makes the camera completely “passive” — letting the tripod do all the work.)
4. Exposure & ISO
- ISO: Manual is best for fixed lighting (no auto changes mid-take).
- Aperture: As needed.
- White Balance: Manual (locks color temp so it doesn’t drift during a take).
5. Picture Profile
- Same as other presets for easy matching (e.g., V-Log, Natural, etc.).
6. Save to C3
- Menu → Setup (wrench icon) → Save to Custom Mode
- Select C3 → Confirm.
✅ Now Your Mode Dial Does This:
- C1 → Smooth Pan (IBIS Panning Mode, E-Stab OFF)
- C2 → Handheld Walk-and-Talk (IBIS Normal, E-Stab ON)
- C3 → Static Tripod (All stabilisation OFF, locked exposure & WB)
💡 Bonus Tip for Tripod Shots:
If you ever need to fake a tiny bit of movement on a tripod shot for a more “handheld documentary” feel, keep IBIS ON but E-Stabilisation OFF — it’ll add micro-movement without warping.
If you’d like, I can make you a printable quick-reference card with all three presets in a side-by-side table so you can carry it in your camera bag. That way, if you ever reset settings or get a rental S5II, you can rebuild them in under 2 minutes.
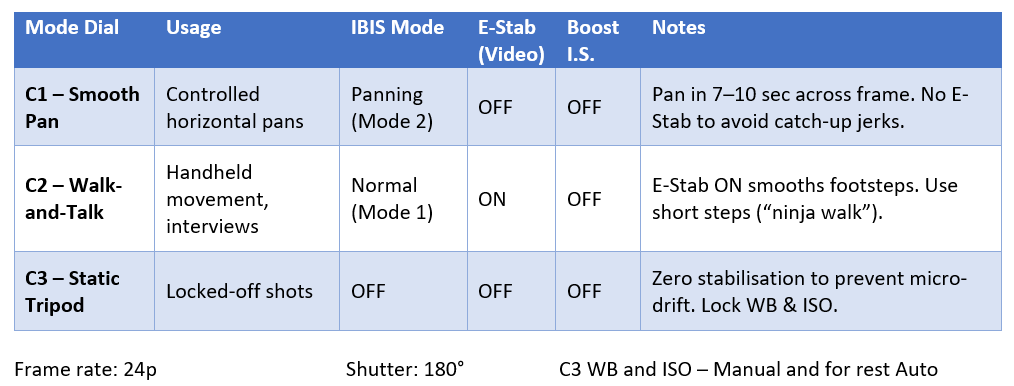
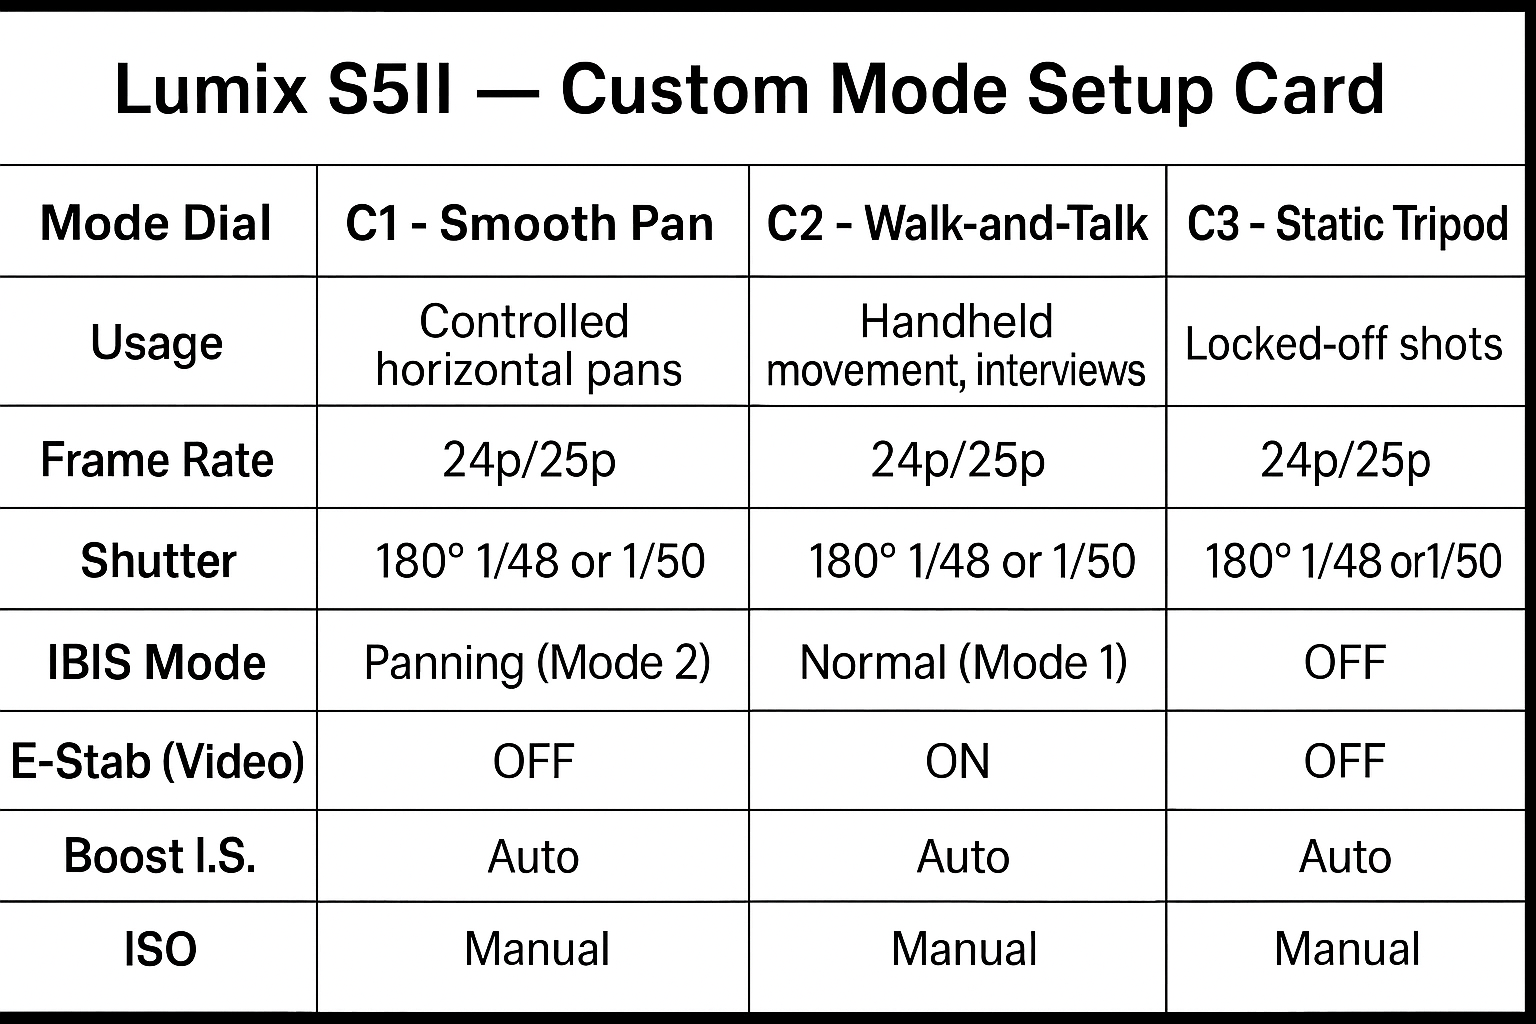
Lumix S5II – Custom Mode Setup Card
| Mode Dial | Usage | Frame Rate | Shutter | IBIS Mode | E-Stab (Video) | Boost I.S. | ISO | WB | Notes |
|---|---|---|---|---|---|---|---|---|---|
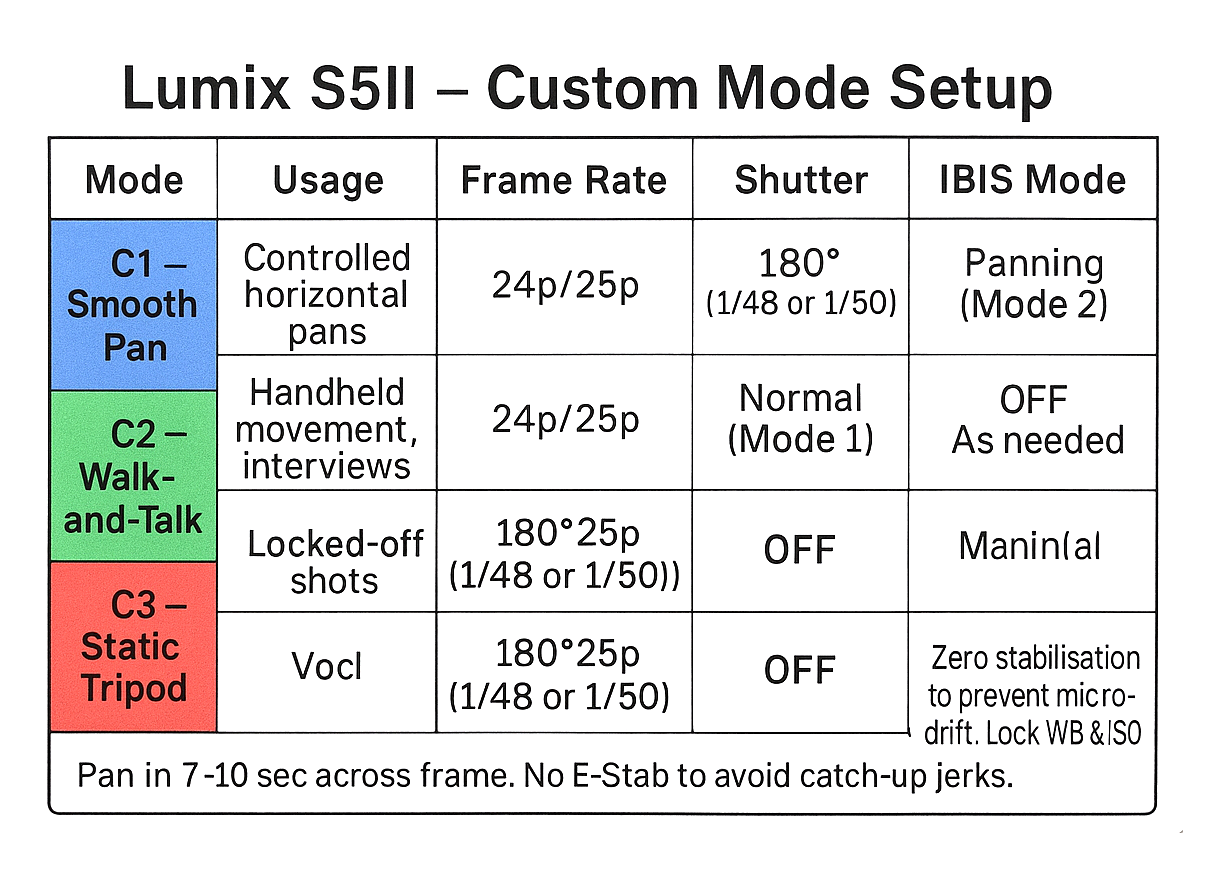
| C1 – Smooth Pan | Controlled horizontal pans | 24p/25p | 180° (1/48 or 1/50) | Panning (Mode 2) | OFF | OFF | Auto | As needed | Pan in 7–10 sec across frame. No E-Stab to avoid catch-up jerks. |
| C2 – Walk-and-Talk | Handheld movement, interviews | 24p/25p | 180° (1/48 or 1/50) | Normal (Mode 1) | ON | OFF | Auto | As needed | E-Stab ON smooths footsteps. Use short steps (“ninja walk”). |
| C3 – Static Tripod | Locked-off shots | 24p/25p | 180° (1/48 or 1/50) | OFF | OFF | OFF | Manual | Manual | Zero stabilisation to prevent micro-drift. Lock WB & ISO. |
Setup Order
- Switch to Video Mode.
- Apply settings for each mode (C1, C2, C3) in the table above.
- Menu → Setup → Save to Custom Mode for each one.
💡 Tips for Best Results
- Keep frame rate consistent across all three so footage matches.
- Always check WB before recording — manual WB avoids shifts during takes.
- Carry this card printed on a small 3×5" card or laminated.
I can also make this as a laminated, double-sided card with color coding and camera icons, sized perfectly for a wallet or camera bag.
Change frame rate
On your Lumix S5II, here’s how to switch from 25p to 24p for video:
- Set the system frequency to include 24p:
- Menu → Setup (wrench icon) → System Frequency
- Change from PAL (25.00Hz) to CINEMA (24.00Hz).
(PAL mode only gives you 25p/50p options; CINEMA mode unlocks true 24.00 fps.)
- Choose 24p in recording settings:
- Menu → Video → Rec Format / Rec Quality
- Select 24.00p (make sure you pick the bitrate/codec you want).
- Note: Changing system frequency will restart the camera and may format the card if it’s incompatible — so back up first.
If you do this often, keep System Frequency in the My Menu (star icon) so you can change it in two clicks before switching to the matching custom mode.
****
Setting minimum shutter speed